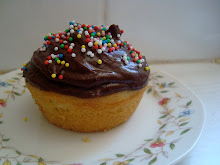
The title is a damn mouthfull!
Incidentally, so are these cupcakes.
I baked them for the RSPCA Cupcake Day, which we got well into at work. We ended up with about 20 varieties of treats and several hundred dollars of funds for the cause (cause being homeless puppies, kitties and the like).
I'm not vegan, but I often bake as if I were. Vegan treats are fluffier and better - 'nuff said.
So I'll give you the vegan version alongside the non-vegan version and leave it up to you to decide. To warn you, though, I've never made them non-vegan so don't call me mean names if you go that route and they're craptastic!
Peanut Butter Cupcakes:
Ingredients:
3/4 cup smooth peanut butter
2 cups plain flour
1/2 teaspoon salt
1 1/4 cups soy milk + 1 tablespoon & 1 teaspoon white vinegar (or, 1 1/4 cup buttermilk for non-vegan)
2 1/2 teaspoons bicarb soda
3 eggs worth No-Egg - instructions on box (or 3 eggs for non-vegan)
1 teaspoon vanilla extract
1/2 cup Nuttelex or an equally kick ass and creamy vegan butter sub (or 1/2 cup butter for non-vegan)
3/4 cup brown sugar
89/100 cup caster sugar (yeah, stupid.. it's my fault... it's like 3/4 cup + 1/8 cup... ish)
To Make:
1. Preheat oven to 180 degrees C
2. Beat Nuttelex (or whatever), peanut butter, brown sugar and caster sugar until extra creamy
3. Add egg substitute or eggs and vanilla and keep beating until very fluffy
4. Beat the soy milk and white vinegar concoction in the bowl of creaminess
5. Mix up the flour, bicarb soda and salt real quick in a separate bowl
6. Add as much as you can at a time, beating after each addition, and stop when the last bit of flour is well-combined
7. Spoon the batter into lined cupcake trays, filling them about 2/3
8. Bake them for 10-15 minutes and make sure you poke a little thingy into them to make sure it comes out clean before you declare them done (you don't want them brown - they should still be white-ish)
9. Right before you take them out of the oven, make some sugar syrup to brush on them. Just boil 1/4 cup water and 1/4 cup white sugar until the sugar dissolves completely.
10. Brush the sugar syrup onto the tops of the cupcakes
***Luckily, mine sunk down a bit, allowing a little hallow for the chocolate ganache. If this doesn't happen to yours (it may not in some ovens), that's cool. Just shmear the chocolate ganache all over the tops***
Chocolate Ganache:
Ingredients:
200grams dark, dairy-free, vegan chocolate (or, any dark chocolate for non-vegan)
4 tablespoons thick soy milk (or, 1 cup pure cream for non-vegan)
To Make:
1. Break the chocolate into pieces and either melt it in the microwave or on stovetop
2. When it's totally, completely melted, add the soy milk (or cream) and stir it VIGOROUSLY
3. Spoon into the hallows of your cupcakes (if they have hallows) or smear it all over the top
Peanut Butter Frosting:
Ingredients:
1 3/4 cups Nuttelex (or, butter for non-vegan)
1 1/4 cups smooth peanut butter
1 teaspoon vanilla extract
5 tablespoons soy milk (or regular milk for non-vegan)
4 - 5 cups icing sugar
To Make:
1. Beat the butter, peanut butter, milk and vanilla together at high speed until it's extremely light and fluffy
2. Add 2 cups of icing sugar and beat at high speed until they're completely mixed
3. Add the next 2 - 3 cups of icing sugar 1 cup at a time, mixing seriously well after each addition. I only used 4 cups, but it's a matter of preference. Just keep tasting it until it tastes how you like it!
***This makes a crapload of icing! I'd suggest halving it or at least making 3/4 of the amount - although that would be some hard math right there***
The last step in the process is to frost the cupcakes! Conceal that creamy ganache with oodles of fluffy peanut butter frosting. I piped it on, but you can spread it if you like. Do whatever.
Just enjoy!
Monday, August 22, 2011
Sunday, September 12, 2010
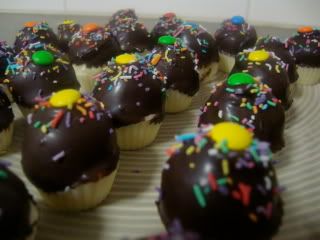
Little Cupcake Bites

No one won the election that evening, but all our guests won because they got to pop a few of these leetle guys.
Bakerella really explains it best, but I'll jot down some easy-as-pie directions just in case clicking on a link is too much work for you.
Actually, if clicking on a link is too much work, I advise against making the Cupcake Bites because it's a tedious process with multiple steps and a bit of waiting...
... and a LOT of pleasure at the end when you eat them.
Little Cupcake Bites
1 box of cake mix (vanilla, chocolate, red velvet, whatever!), or make your own.
1 can of frosting (or... make your own)
1 block dark/milk chocolate or dark/milk chocolate bits for melting
1 block white chocolate or white chocolate bits for melting
A candy mould
Sprinkles
Mini m&m's
1. Make the cake, then allow it to cool.
2. Once cooled, crumble it up so it's all crumbly in a mixing bowl.
3. Add the frosting and mix them.
4. Roll the cake-frosting paste into little balls, then pop them in the fridge.
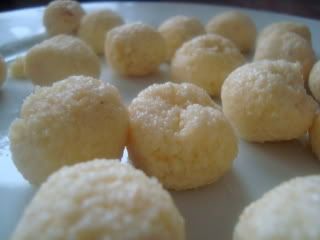
5. Melt your white chocolate and divvy it up into the candy moulds (almost 1/2 full).
6. Press a little cake ball into each mould so that the white chocolate is pushed up around the sides of the ball.
7. Put them in the freezer to set.
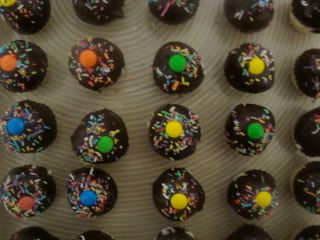
8. Once set, melt the dark/milk chocolate and remove the cake balls with the white chocolate base from the moulds.
9. Dip them into the dark/milk chocolate upside-down.
10. If you have a friend, have them sprinkle and m&m the Cupcake Bites right after you dip them.
11. Put them in the fridge to set.
Saturday, July 31, 2010
Little Lemon Cheesecakes with Whipped Cream Topping

For the MasterChef finale, we served up dinner and dessert with all the trimmings. G made a real yum curry, and I provided the lemon cheesecake. We traipsed down to St. Kilda with our Tupperware and plates wrapped in foil and watched the finale with some friends. Adam, the "lawyer with a creative flair for the exotic" (or something like that) took the prize, and I took a lot of food from my plate to my mouth.
The recipe is from About.com. The original recipe is for a full-sized pie, but I halved it and made four mini cheesecakes in tart tins. I also made a crust out of cookie crumbs and melted butter instead of the pastry pie shell that the recipe calls for.
These little guys were really, really, really good! One of the best treats I've ever made or had. For real!

The recipe below is my slightly altered version, but you can view the original here.
Little Lemon Cheesecakes with Whipped Cream Topping
Crust:
About 185 grams of Nice biscuit (or graham cracker) crumbs
1/2 teaspoon cinnamon
1/4 teaspoon nutmeg
90 grams butter or margarine, melted
Filling:
1/2 package cream cheese (Philly da best!), softened
1/4 cup sugar
1 tablespoon fresh lemon juice
1 eggs
Whipped topping:
1/2 cup heavy cream
2 tablespoons confectioner sugar
1 teaspoon vanilla
1. Preheat oven to 175 C (350 F)
2. Use a food processor to make crumbs of the biscuits
3. Add cinnamon and nutmeg
4. Add melted butter/margarine and mix--it should be wet and pasty, like a delicious cookie plaster
5. Press the mixture into greased tart tins, covering the bottom and up against the sides
6. In a mixing bowl, beat together cream cheese, sugar, lemon juice, and the egg (I don't have an electric beater at the moment, so I used a whisk and it was A-okay, sweetie-pie, no problemo)
7. Poor the mixture into the tart tins
8. Bake for 20 minutes-- they will be slightly firm to the touch
9. Chill for an hour or so, until they are thoroughly chilled (I put mine in the freezer because I was in a hurry)
10. When they're nearly chilled, mix together the cream, confectioner sugar, and vanilla with a beater (once again, I have no beater so I whisked it into a whipped cream... I had sweat on my brow by the time it was fluffy)
11. Spread the whipped cream onto the tarts
That's all! Oh boy!


Monday, July 5, 2010
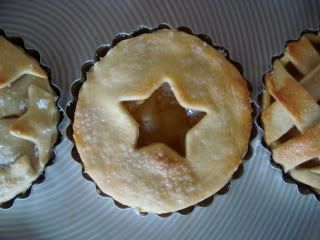
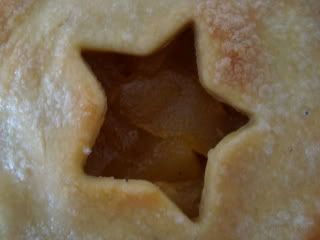
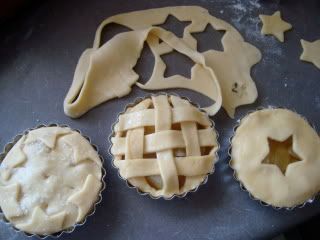
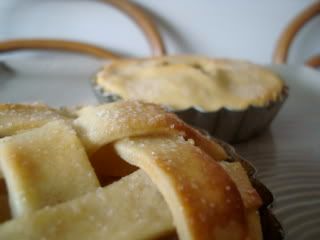
Mini Apple Pies
Two days ago I celebrated the 14th anniversary of Will Smith saving Earth by thwarting a hostile alien invasion. I also celebrated the USA's independence!
It's far too cold in Melbourne for a picnic, BBQ, or any of the usual 4th of July activities, so I hung a star-spangled banner in the hallway and got to bakin'.
When I took them out of the oven and left them on the kitchen table (which is actually in the lounge room), I remembered that tale about the pie cooling on the windowsill. Doesn't a bad boy come along and steal it? Or stick his thumb in it? I Google'd it, and all I found were some vague references. I did find this, though:
Wen I wus a liddle boy,
Jes thirteen inches high,
I useter climb de table legs,
An' steal off cake an' pie.
Altho' I wus a liddle boy,
An' tho' I wusn't high,
My mammy took dat keen switch down,
An' whupped me till I cry.
Jes thirteen inches high,
I useter climb de table legs,
An' steal off cake an' pie.
Altho' I wus a liddle boy,
An' tho' I wusn't high,
My mammy took dat keen switch down,
An' whupped me till I cry.
I bet Momma makes some good pie, so as if it wasn't worth the whuppin'!
So, the pies I made were very cute and really quite tasty. The crust was more of a chewy pastry than a flaky, crispy pastry, so I dunno how you feel about that. I think I prefer a flaky crust, but G seems to love the chewy crust. So we are a household divided.
Mini Apple Pies
Apple Mixture:
2 apples (Granny Smith are best for pie!)
2 tablespoons butter or margarine
1/4 teaspoon cinnamon
1/4 teaspoon nutmeg
1/2 cup sugar
1 cup water
1. Peel and chop up the apples-- slices of you want to fan them out in some sort of beautiful way, or small chunks for more of a filling, which is what I did.
2. Melt the butter/margarine in a saucepan, then add apples.
3. Cook for a few minutes, then add the sugar, water, and spices.
4. Simmer until the apples are soft.
While the apples are cooking, make the dough:
1 tablespoon vegetable oil
1 tablespoon margarine or butter
1/3 cup water
2 cups flour
1. Mix all ingredients in a mixing bowl.
2. Knead dough on a floured surface.
3. Roll out flat.
4. Cut out circles (I used the lid of my margarine container-- it was perfect).
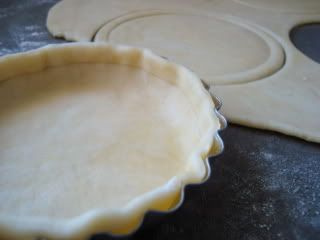
5. Now, you can put the circles in little pie tins/tart tins then fill them with apple and cover them however you like. Or, you can put apple on one half of the circle then fold it over and seal the edge with a fork-- a delightful apple turnover! I brushed the tops of the pies with some of the apple juice from stewing the apples, then sprinkled on some sugar.
6. Bake at 375 F (190 C) for 15-20 minutes or until golden on the edges.
It would have tasted better if there had been fireworks exploding away in the background.
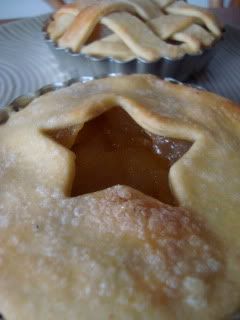
So, the pies I made were very cute and really quite tasty. The crust was more of a chewy pastry than a flaky, crispy pastry, so I dunno how you feel about that. I think I prefer a flaky crust, but G seems to love the chewy crust. So we are a household divided.
Mini Apple Pies
Apple Mixture:
2 apples (Granny Smith are best for pie!)
2 tablespoons butter or margarine
1/4 teaspoon cinnamon
1/4 teaspoon nutmeg
1/2 cup sugar
1 cup water
1. Peel and chop up the apples-- slices of you want to fan them out in some sort of beautiful way, or small chunks for more of a filling, which is what I did.
2. Melt the butter/margarine in a saucepan, then add apples.
3. Cook for a few minutes, then add the sugar, water, and spices.
4. Simmer until the apples are soft.
While the apples are cooking, make the dough:
1 tablespoon vegetable oil
1 tablespoon margarine or butter
1/3 cup water
2 cups flour
1. Mix all ingredients in a mixing bowl.
2. Knead dough on a floured surface.
3. Roll out flat.
4. Cut out circles (I used the lid of my margarine container-- it was perfect).
5. Now, you can put the circles in little pie tins/tart tins then fill them with apple and cover them however you like. Or, you can put apple on one half of the circle then fold it over and seal the edge with a fork-- a delightful apple turnover! I brushed the tops of the pies with some of the apple juice from stewing the apples, then sprinkled on some sugar.
6. Bake at 375 F (190 C) for 15-20 minutes or until golden on the edges.
It would have tasted better if there had been fireworks exploding away in the background.
But setting of fireworks in Melbourne would be neither ethical nor legal.
Sunday, July 4, 2010
Friday, July 2, 2010
Jo Bean and the Amazing Technicolour Heart Cake
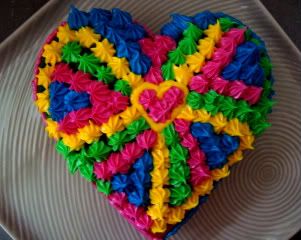
Have you ever heard of Joseph and the Amazing Technicolor Dreamcoat? Probably not. Doesn't matter. Have you ever been obsessed with the idea of making a cake that looks like a rainbow explosion? It's been on my mind for a few days now, and today I finally remembered to buy more vanilla essence so I could finally make my dreams come true.
I baked it with the intention of trading it for some art at SUPER MARKET-- an art show where everything and anything is legal tender except dollars and cents. I heard someone was doing silhouette cut-outs, and I intended to offer my cake in exchange for my silhouette. But then I was overcome with a great fear of rejection and a great rolling, rumble in my stomach.
So...
Anyway, it's my vanilla cupcake recipe, halved. And lots of food colouring.
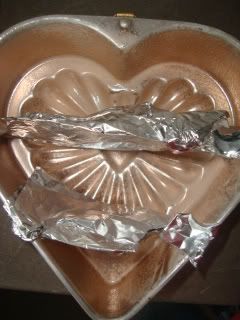
I used foil to divide the heart pan into three section to at least somewhat separate the 3 colours. It's a bit ghetto and didn't work particularly well. I'll use cardboard next time.
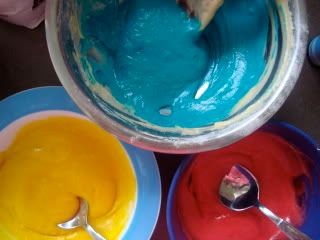
The batter took the food colouring very well. The red looked a bit pink, but das cool.

The batter's in the pan, looking like some sort of flag (maybe Primary Colourland's), and ready to go.

The frosting, the frosting, the frosting!
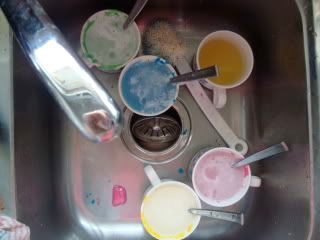
It looks like an artist's sink!
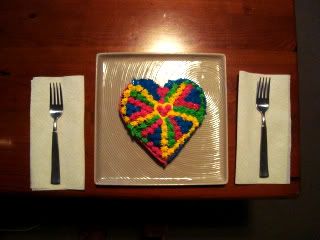
Why would I need two forks? S'not like I'm sharing...
Saturday, June 26, 2010
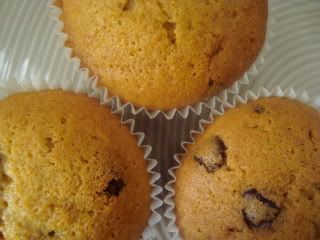
Pumpkin Chocolate Chip Muffins

I'm jealous of anyone that is eating one of these muffins when I'm not.
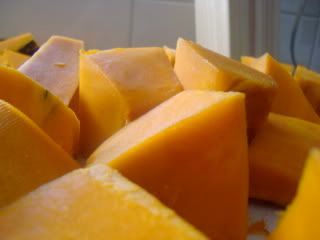
I know that Australians get pretty uneasy about pumpkin being used in sweet treats. You're all about roasting pumpkins or pureeing them into a soup. But I'm all about the pumpkin pie, pumpkin cake, pumpkin cookies, and best of all- pumpkin chocolate chip muffins.
I just realised what a cute word "pumpkin" is. It sounds like the name of a little creature. Maybe the adult of the species is called a "pump" and the babies are "pumpkins." I bet that if a pumpkin scurries across your path, it would mean good luck for infinity.
I got this recipe from JoyofBaking.com. I mostly stuck to it-- the only changes were margarine instead of butter, a little extra vanilla, dark chocolate instead of semisweet, and fresh pureed pumpkin instead of canned. These muffins are sweet, but very wholesome and aromatic (thanks to the nutmeg, cloves, ginger, and cinnamon). I used dark chocolate chips, and in my opinion that's the right thing to do. Milk chocolate would be tasty enough, but I think the richness of the dark offsets the pumpkin rather nicely.
Oh, and, the fee for reading this blog entry is one muffin. Pumpkin Chocolate Chip, please.
Pumpkin Chocolate Chip Muffins
1 1/2 cups all purpose flour
1 teaspoon baking soda
1 teaspoon cinnamon
1/4 teaspoon ground ginger
1/4 teaspoon ground cloves
1/4 teaspoon freshly ground nutmeg (so you're supposed to get a packet of whole nutmeg pods and grate one... but if it's impossible or too much effort, just use the pre-ground stuff)
1/2 teaspoon salt
1/2 cup unsalted butter at room temperature (I used margarine)
1 cup white sugar
2 eggs
2 teaspoons vanilla
3/4 cup pumpkin puree (I used the Kent variety and it was fantastic. Cut the rind off the pumpkin, steam it, then mash it. Alternatively, use canned pumpkin)
1 cup chocolate chips (do the right thing...)
1. Preheat oven to 350 F (180 C), grease 12 muffin cups and put them in muffin tray
2. In a large bowl, sift together flour, baking soda, ground spices, and salt
3. In a separate bowl, cream butter and sugar (better to use an electric mixer, but I did it by hand)
4. Add the eggs, one at a time, beating well
5. Beat in vanilla
6. Alternate adding 1/3 of the flour mixture and 1/3 of the pumpkin puree, mixing after each addition
7. Add chocolate chips
8. Distribute evenly in muffin tin, ready with greased muffin cups
9. Bake for 18-20 minutes

Subscribe to:
Comments (Atom)